To get all the benefits out of test automation, you need to have a right test automation framework in place. Since every project is unique, the requirements, duration, and tool choice will vary. That’s why your primary goal is to select an automation framework that leads to smarter testing, productivity benefits, and better overall results in your particular project.
So what should you consider to make the right choice?
Our quality assurance team asks this question each and every time they start working on a new project. To save our time, we’ve worked out a step-by-step checklist that guides our test automation framework choices. Now we are sharing it with you.
This guide is designed to help you choose a right tool whether you are a QA or Test Automation (TA) specialist, stakeholder, or business owner who takes part in the development process:
Step 1. List out project requirements
Step 2. Define the budget for Test Automation
Step 3. Consider the tech stack
Step 6. Put it all together and make the final decision
How to choose a top-flight test automation framework for your needs
To make the task easier, we’ll review the tool selection process in the context of one of our projects.
It involves testing a private practice and clinic management software for our client from Europe. The solution transforms how clinics operate, how clinical notes are recorded, and gives insight into all parts of the processes.
Step 1. List out project requirements
Everything starts with the requirements. The first exercise for you is to reach a clear understanding of expectations before applying any tool on the project. It means that the testing framework should focus on a specific problem (s).
Each framework on the market is neither entirely good nor bad – everything depends on your particular project, solution, and software development methodology.
Read next — All you need to know about types of software testing before product launch
Among the aspects that’ll help you start is the type of system, level of software testing (unit testing, integration testing, performance testing, load testing, or other), an average project scope, test coverage, nice-to-have features like reporting, etc.
So first of all, figure out your needs and write them down.
In our particular case, we had to automate a user interface (UI) testing for a web application. Here is a short entry list of requirements:
- cross-browser testing (Chrome, Safari, Edge);
- full coverage of end-to-end regression scope;
- fast execution;
- simple reporting; and
- continuous integration (CI).
Additionally we have certain “must have” add-ons for our TA project, like CI and infrastructure for running tests, results visualization (reports), and test data management via API.
Analyze your own project up and down and make a similar requirements list that will become a foundation stone for your future automated testing framework.
Step 2. Define the budget for Test Automation
This is one of the most important aspects while selecting the automation test frameworks. On this step you have three options for TA tools to consider:
- open-source;
- commercial; or
- customized.
Open-source tools are free tools with an active community, free tutorials, and meetups. Due to this, they are constantly evolving and you have a great opportunity to make a contribution. But it has a flip side to the coin. Such solutions thrive as long as the community supports and improves them. If it stops (for whatever reason), it may become outdated or discontinued. Moreover, such tools often require adjustments to fit your needs.
That is where customized solutions come into play.
In situations that the functionality of an open source tool is not enough, you can build an improved solution based on the open-source framework. Sure, you’ll need strong expertise, a sizable budget, and have no access to the community, but, at the same time, you’ll build exactly what you need for your project.
Most commercial tools have a rich set of features out of the box, quick set up and good support. They usually have paid tutorials and small communities. Along with high cost, this makes them rather unpopular, except for large enterprise projects. If you’re ready to spend money on a commercial tool, better to start a free trial and experiment on a small project before buying the full package.
For those companies and teams who are only at the beginning of their automation journey, open-source frameworks are often the best option to start with.
Read next — Usability testing: how to analyze your website for UX pitfalls
In any case, you should not expect to find the best tool at once. Think about the “proof of concept phase” which will allow you to analyze the framework and understand whether it is a good fit (we’ll talk about it further).
In our particular case for clinic management software, we’ve selected an open-source tool. To know why let’s move to the next step.
Step 3. Consider the tech stack
The tool must support the programming languages used on the project as well as the operating systems your testers are comfortable with (e.g. Windows, Linux, Mac, etc.).
In case you work with mobile apps, you’ll also have to consider the supported platforms. If you target two platforms, you can either choose a tool that supports both iOS and Android (e.g. Selenium, Appium) or use separate testing suites (e.g. Robotium for Android, UI Automation for iOS).
For programming languages, looking at modern trends in automation, it is evident that most projects use JavaScript (JS) for different levels and types of testing.
If your project is done on JS, try to use it for test automation, too. If you have a solution using another programming language, Java, for example, it’s better to use that. It’s not critical, but this way doesn’t expand your tech stack and allows you to ease into the process while helping to avoid unexpected issues.
In our example, we have a ReactJS web application. Due to this fact, our choice came down to JavaScript frameworks for end-to-end (E2E) UI test automation.
In order to find the tools, you can do whatever you can: make personal research, ask colleagues or friends, explore the most downloadable tools, etc.
For example, NPM Trends is a great tool to find out the popularity of open source automation test frameworks.
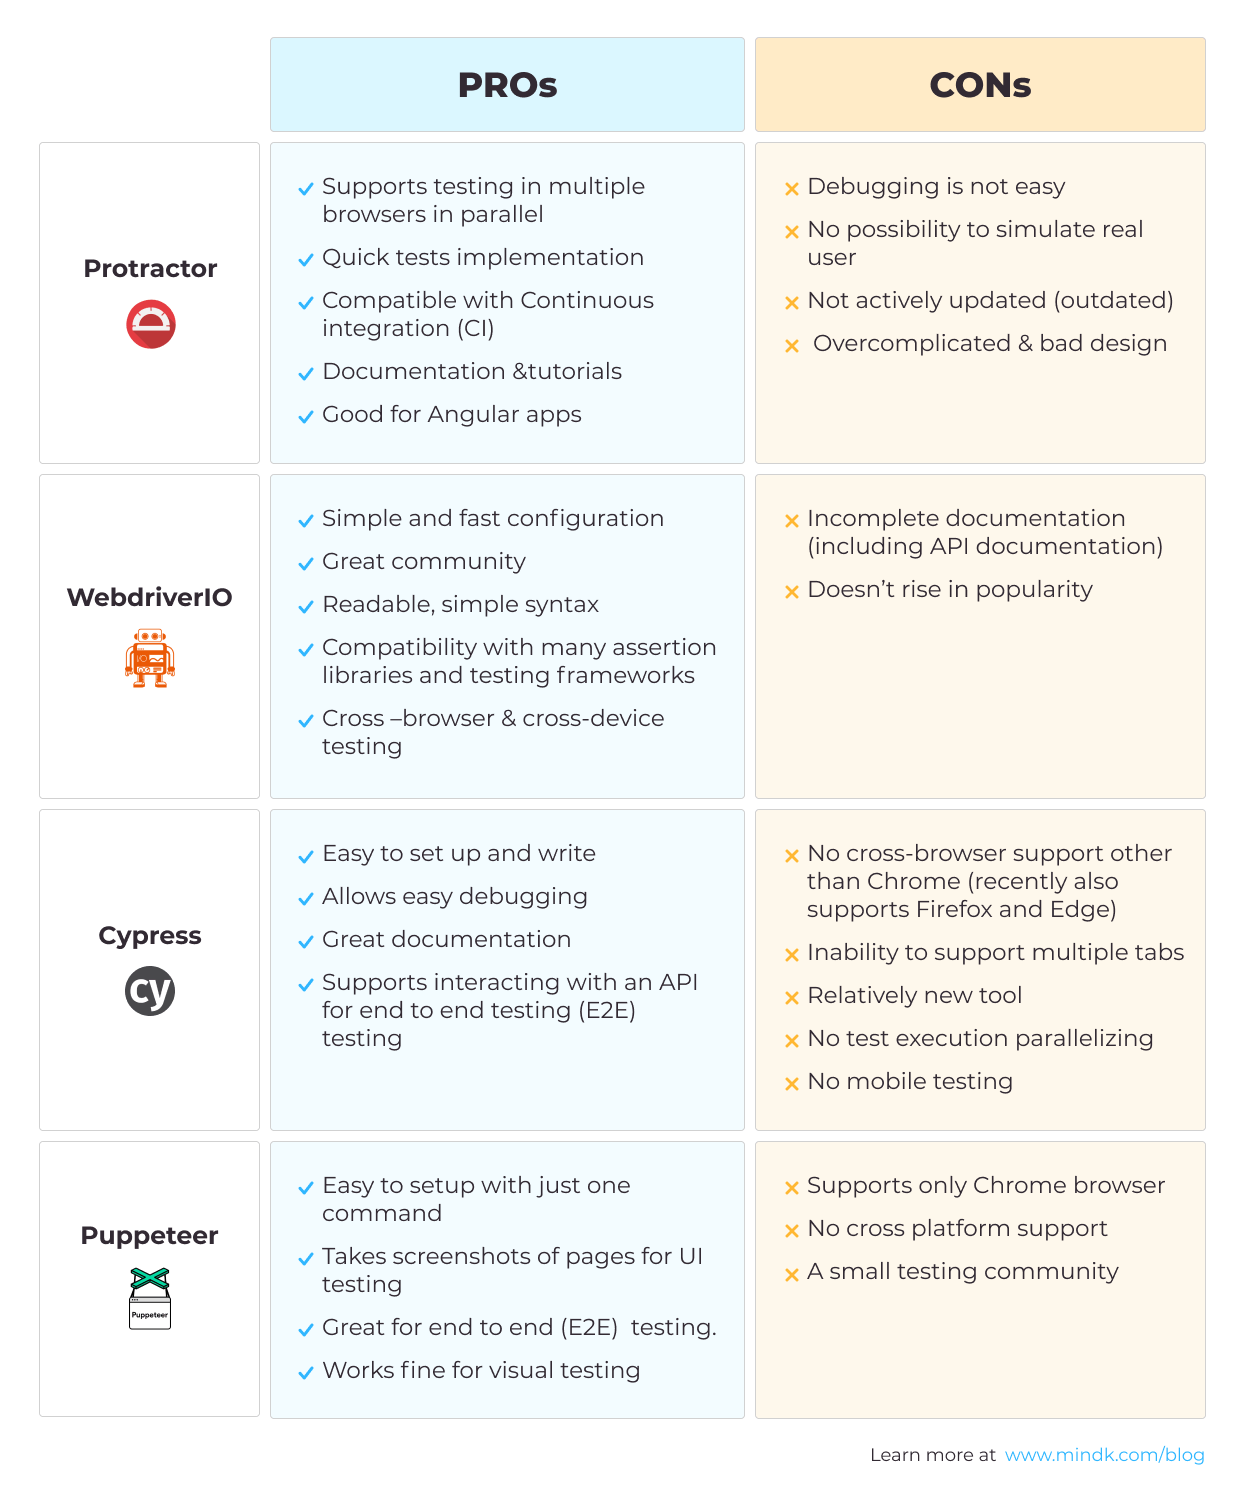
From the data, we found that Puppeteer, Protractor, Cypress and WebdriverIO are some of the most downloaded testing frameworks over the last year. However, there are also many other good frameworks you can consider like Testcafe, Nightwatchjs, etc.
There is no clear winner on this step, as each of the frameworks required in-depth analysis.
Step 4. Analyze and compare
To ensure the testing tool is beneficial for project needs, the QA team has to dig deeper. A tool comparison matrix is a great way to make an informed decision on the basis of your requirements.
Give your project requirements a second glance and decide the key characteristics you are going to compare.
After we’ve analyzed our initial set of tools, we concluded that none of the top four tools fully suited our project requirements.

WebdriverIO requires control from a TA Engineer, including lack of built-in error messages that need to be defined manually. Cypress, as well as Puppeteer, have no cross-browser testing that is quite a problem in our particular case.
That is why we went back to the list of test automation frameworks and analyzed the rest, less popular, testing tools in the same manner.
The more extended analysis brought us to CodeceptJS, which seemed to cover the whole list of initial project requirements in one go.
CodeceptJS is an ‘all-in-one’ open-source framework meaning it is a wrap around multiple testing tools. It allows cross-browser testing, code is easy to understand, everything is well documented, there is even a test UI where you can see snapshots of each test step and debug it easily.
Step 5. Verify your choice
When you have a preliminary winner among the automated test frameworks, don’t hurry to implement it right from the start.
The more rational way to start introducing a new framework into your test process is to make a proof of concept (POC). Most teams skip this phase, however, it may be very useful in case you still have some doubt about the tool and want to make sure it is the “one and only”.
A POC in a short period of time can provide you with valuable information about the tool usability but also whether the right people are involved, and whether the testing goals are clear, etc.
Moreover, it helps you identify the possible risks even if you are not familiar with the new tool or technology.
The proof of concept should begin with setting immediate goals it has to meet. Keep in mind that its main goal is not actual test automation implementation, but defining what kind of tools, methods and resources you’ll need for a successful test automation process. It should balance between the need to uncover the key automation challenges and
demonstrating feasibility of the tool.
Most commonly, the outcome of the proof of concept phase is one of the three:
- Tool is a good fit and meets the project requirements. In this case you have to proceed with further details. If you plan to apply a commercial tool, consider license fees, training & support costs, cost of implementation, etc. In case of open source, investigate learning resources available, learning curve, support available etc. Maintenance costs have to be considered too both for commercial and open source tools.
- Tool has certain limitations and does not meet the requirements. In such a case, the tool is no longer considered as an option.
- Tool meets the requirements but only partially. Check out whether there is any other workaround with the same tool, or if any requirements can be covered in another way, etc. If not, consider another framework with better ROI.
Turning to our case study, we tried CodeceptJS on our test environment and confirmed it was a good fit to our project requirements.
Step 6. Put it all together and make the final decision
This is the closing stage of your selection process. Now your team has all the necessary information to make an informed decision.
The QA team should have a strong awareness of the tests automation tool, understand all the strong and weak points of the solution and keep the balance between cost and benefit. This decision greatly influences the project, the testing process, and the business goals, which is why you should spend a good time analyzing all the information you obtained.
With CodeceptJS on our project, we’ve successfully run more than 1500 test cases and revealed 500+ bugs in just twelve hours.
Ready to initiate a search for a test automation framework?
Selecting a test automation tool is tricky, as every tool is a good player on its own ground.
But nothing is impossible when you know exactly what result you pursue. That is why understanding your project objective from the start, recognizing your team’s strengths and weaknesses and being ready to make in-depth analysis of the tools will help you start the process on the right foot.
I hope the tips we’ve shared here will help you on the road to the best test automation framework for your project needs.
But, if you’re still feeling a bit overwhelmed with the ocean of tools on the market, don’t hesitate to drop us a line. We’d love to understand your challenges and see how our team can help you on your software development journey.


